
The plans for the LuxoTear are of our own design. We do not sell these plans. However, for those interested in constructing a teardrop trailer, we offer these views of our plans. Perhaps some elements of these drawings will inspire you make a trailer you will enjoy building and enjoying using for many years. Click on the plan images to get a larger view. If your browser blocks pop-ups, you need to turn that function off to see the larger images.
Although we originally purchased plans from Desert Teardrops and Kuffel Creek Press, we wanted a custom-built trailer that would meet our desire for quality, craftsmanship, and features. We spent months doing research about construction methods, materials, electrical systems, and available parts. A great resource was the Internet, including construction techniques and design elements that have been posted by other teardrop builders kind enough to share their ideas through the Teardrops & Tiny Travel Trailers Forum and other teardrop sites (for example, Denny Unfried.). The lovely profile of the LuxoTear was made possible through the brilliant explanation of the basic ellipses posted by Andrew Gibbens. We also used the inside-out method of building the ceiling by first installing the inside ceiling panneling as described by Steve Frederick, whose techniques for using a router and full-sized templates were also invaluable.
We used a computer illustration program, lots of scratch paper (and considerable scratching of heads), templates, and mockups to work through and refine the design. The biggest help was the attitude that if we didn't know how to design or build a particular feature, we could learn how.
Disclaimers
There are many disclaimers about these plans which are important to read if you are considering using this as a resource for your teardrop project:
- These plans are NOT FINAL and the dimensions are NOT EXACT. The plans shown here are the early drawings, and many details and dimensions changed and evolved during the construction process without being reflected in these drawings. View these as general guidelines only.
- Many features of these drawings are overly simplified, and many construction features are not addressed at all, such as door construction, window frames, etc. These plans are in no way complete. To help fill in some of the blanks, view more detailed photos in LuxoTear Construction Photos I and LuxoTear Construction Photos II.
- These plans are the intellectual property of their creators and are protected by copyright law. They many not be reproduced or sold. They are offered here in the spirit of community and sharing as a reference source to benefit individual teardrop enthusiasts.
Construction of the LuxoTear
Frame
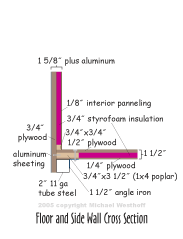
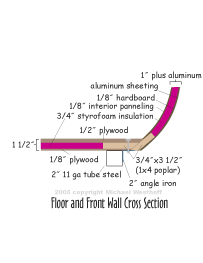
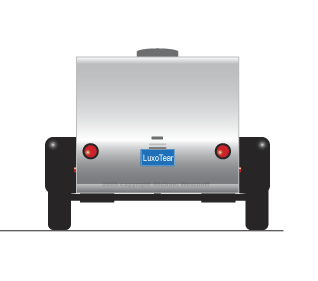
The first step was building the frame, which is made out of 2-inch 11 gauge tube steel with some cross members made of 1x2 tube steel to reduce weight. There are brackets made of angle iron with holes for bolting the floor to the frame. The axle is a Dexter Torsion axle and has resulted in smooth and easy towing. The frame is approximately 56 inches wide, which allows the LuxoTear to use a full-size mattress; this makes using materials in a 4x8 world more frustrating and expensive. However, the extra room inside is well worth it! A receiver hitch was added to the back for a future bumper or bike rack. There are stabilizer jacks in the rear corners.
Floor
The insulated floor is made of 1x4 poplar and uses lap joints, screws, and glue for rigidity. Wider lumber was used for the front and back frame members to reinforce areas that overhang the frame.
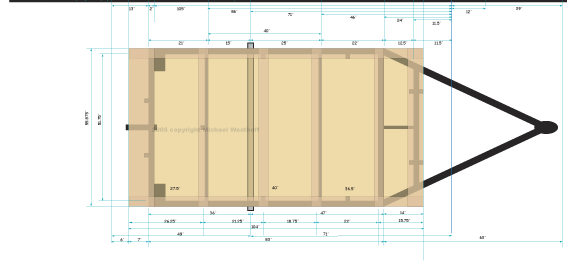
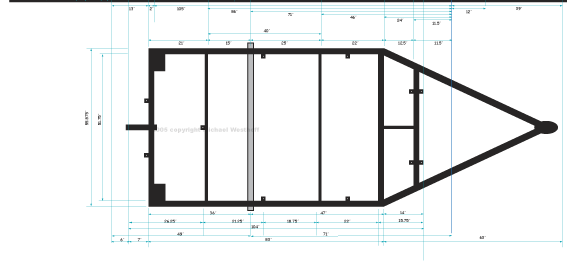
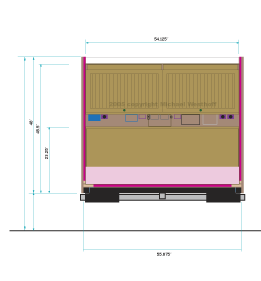
Floor Plan
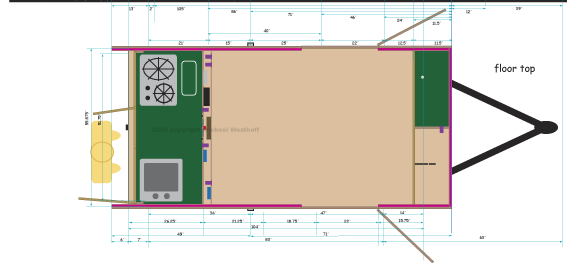
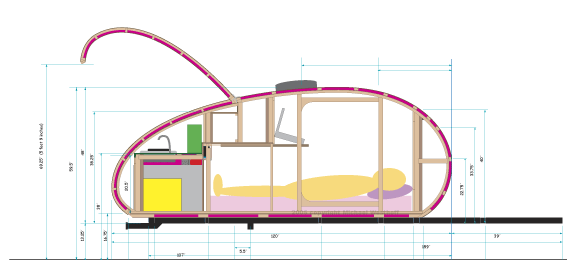
The overview below shows the cabin with front closet and countertop, as well as the countertop in the galley (lower cupboard doors are shown open). The white outline behind the stovetop is the ice hatch for icebox. The many colored boxes show items in the electrical raceway that is located behind the back splash of the galley counter. This raceway is accessible from the cabin.
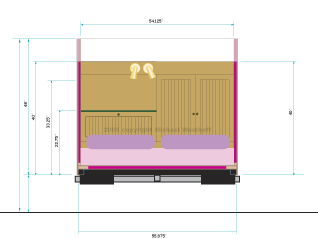
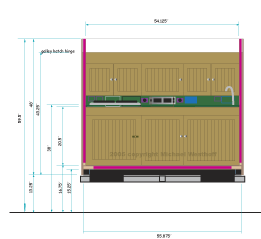
This view is toward the front of the trailer, where our heads lie (pillows are depicted in purple). To make the most of available storage space but still allow for a horizontal shelf, we split the front area into a short closet on one side and a formica countertop with a flip-down door on the other side. Room set a plate, a drink, a book, etc. comes in very handy! There are two directional reading lamps mounted above the cabinets and an overhead dome light in the center of the ceiling.
Below are the upper galley and over-foot cabinets. The final plan has equally sized galley cabinet doors with side pockets for vertical storage of plates and frying pan (not shown).
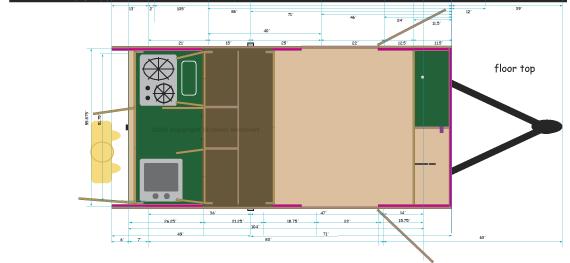
The over-foot cabinet doors lift up and have stays, and we added a row of three low-height drawers (not shown) under the over-foot cabinets. There are two drawers for holding your pocket contents and other personal items during the night. The central drawer pulls out and supports a laptop for viewing DVDs—our teardrop entertainment system! The electrical raceway is shown here without its flip-down door.
This view is of the original galley cupboards, which have been modified for better storage options. The center panels of the doors are oak bead-board. There is a towel rack just above the central lower door (centered just under the countertop) and another towel rack and paper towel dispenser above on the inside of the hatch so they are accessible overhead in the galley. There is also a dome light on the inside of the hatch that nicely lights cooking after dark.
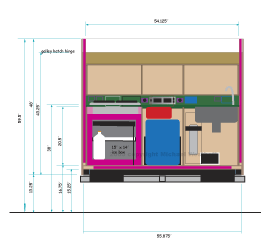
We covered the countertop and back splash with formica. The stovetop is a 2-burner drop-in unit, and the sink is a 15-inch single stainless bowl from Home Depot. Under the sink is an electric water pump and water filter (be safe about water quality!). In the center lower cupboard is the battery, a 7-gallon Aquatainer, and a disposable propane tank for the stove. The icebox, under the stove, uses 2-inch rigid foam insulation and is made from left-over aluminum from the exterior skin.
Framing and Walls
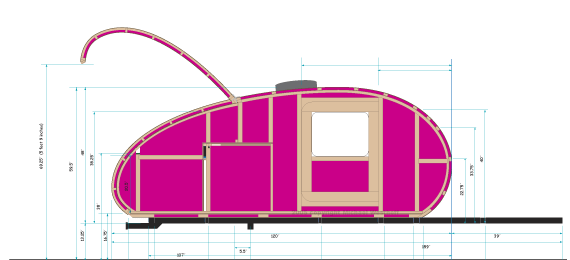
The basic cabinet framing is shown below. There are three bulkheads—two vertical and one horizontal—that tie the sidewalls together, separate the cabin from the galley, and serve as the back and bottom panels of the cabinets. The countertop also serves as a horizontal bulkhead and gives stabilization near the galley hatch.

The wall framing is poplar (the hatch is shown here both open and closed). The view below also shows the outline of the icebox, which is under the stovetop. It has a shelf for ice which can be accessed through a hatch in the countertop; there is also a front door to access food.
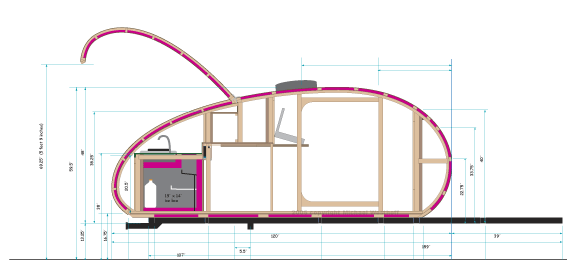
The view below shows the size of a 5-foot-6-inch occupant for reference. This was a helpful step in designing the cabin.
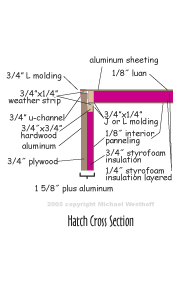
The walls and ceiling are insulated with 3/4-inch rigid foam. Most of the wiring runs in conduit through the walls in grooves routed into the insulation and framing. The hatch uses 1/4-inch insulation in layers to avoid having to make many kerfs.
Exterior
The outer walls are 3/4-inch plywood; 4x10 sheets were necessary to make the sidewalls with no seams. Add aluminum skin and fiberglass fenders for a great profile.

The galley hatch has a central locking latch which retracts 2 side pins. The long, highly curved shape of this hatch made the "dreaded hatch" even more difficult on the LuxoTear. However, the open design of the galley and full clearance for the lower cupboards was worth the extra effort. To get a good weather seal, we added two overcenter latches at the outboard lower edges of the hatch to make sure it stays tightly closed.
| Back to Top | Michael Westhoff Home Page |
| LuxoTear Page | LuxoTear Construction Photos I | LuxoTear Construction Photos II |